


A 7x10 single axle enclosed trailer is a versatile workhorse, perfect for hauling everything from contractor equipment to weekend toys. But its true potential is only unlocked when you can guarantee your cargo arrives safely and securely. Unsecured loads are a liability, leading to damaged goods, unsafe driving conditions, and unnecessary stress. This is where a professional cargo securement system becomes not just an option, but a necessity.
The Versatility of the 7x10 Single Axle Enclosed Trailer
The 7x10 single axle configuration strikes an ideal balance between capacity and maneuverability. It’s large enough to handle significant loads for small businesses, landscapers, or motorcycle enthusiasts, yet compact enough to be towed by most SUVs and trucks without difficulty. This enclosed trailer protects valuable equipment from weather and theft, making it a popular choice across numerous industries. The growth of the overall trailer market, projected to reach $64.61 billion in 2025, underscores the increasing reliance on these essential tools.
Why E-Track is the Ultimate Cargo Securement Upgrade for Your Trailer
While basic D-rings and bungee cords offer minimal security, an E-Track system transforms the interior of your trailer into a fully customizable, high-strength tie-down grid. E-track is a system of heavy-duty steel rails with multiple anchor points, allowing you to secure virtually any type of cargo, of any shape or size, precisely where you need it. The rapid adoption of this technology, reflected in a global E-Track System market that reached USD 1.85 billion in 2024, highlights its effectiveness and growing importance.
What This Comprehensive Guide Will Cover
This guide will provide everything you need to know about outfitting your 7x10 single axle enclosed cargo trailer with an E-Track system. We will cover the core components of your trailer, the specific benefits of E-track, strategic layout planning, a detailed step-by-step installation process, and best practices for using and maintaining your new cargo securement system for maximum safety and efficiency.
Understanding Your 7x10 Single Axle Enclosed Trailer
Before upgrading, it’s crucial to understand the foundational components and capabilities of your trailer. This knowledge ensures you make informed decisions about installation and load management.
Key Advantages of a 7x10 Single Axle Configuration
The primary advantages of a 7x10 single axle trailer are its efficiency and ease of use. With only one axle and two wheels, there is less rolling resistance, potentially improving fuel economy. The reduced weight and simpler design mean fewer tires and brakes to maintain. Furthermore, its shorter length makes it significantly easier to navigate in tight spaces, back up, and park compared to larger, tandem-axle models.
Core Specifications and Components to Know
A typical 7x10 enclosed trailer is built on a sturdy frame with specific components that dictate its performance and capacity.
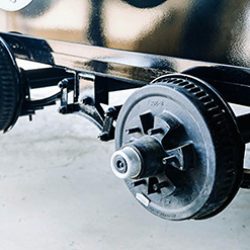
- Axle and Weight: The single axle is typically rated for around 3,500 lbs. Gross Vehicle Weight Rating (GVWR), which is the maximum total weight of the trailer and its cargo. Understanding your trailer’s payload capacity (GVWR minus the empty trailer weight) is critical for safe hauling.
- Wheels and Tires: These trailers usually feature 15-inch wheels with radial tires designed for durability and load-bearing. Regularly checking tire pressure and tread depth is essential for safety.
- Brakes: While some basic models may not have them, the addition of electric brakes is a highly recommended safety feature. Electric brakes provide significantly more stopping power and control, especially when hauling a heavy load. They work in sync with your tow vehicle’s braking system for a smoother, safer experience.
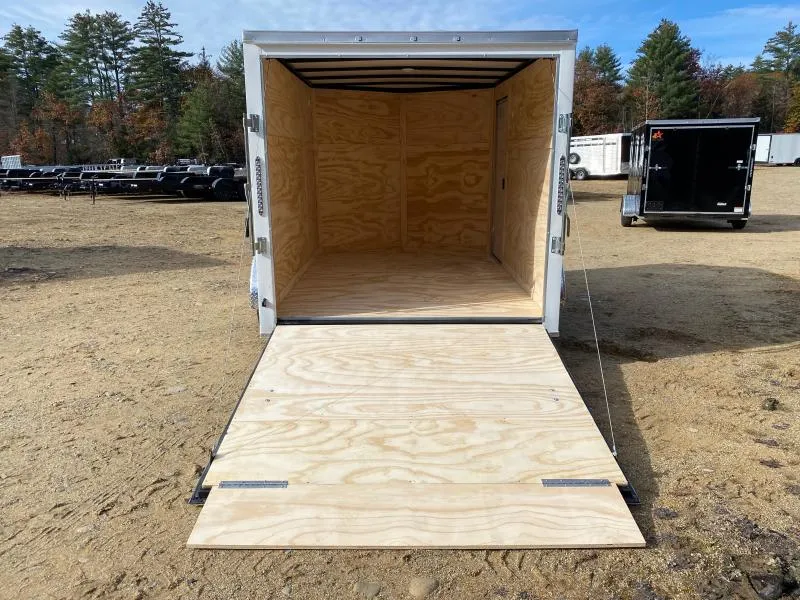
- Doors: Common options include a rear ramp door for rolling equipment or double barn doors for forklift access. A side door is also a standard feature for convenient entry without opening the main rear doors.
Ideal Use Cases: Perfect for the Business Owner, Hobbyist, and Medium Loads
This trailer size is a favorite for a reason. Landscaping companies use it to haul mowers and tools, contractors secure valuable equipment, and powersport enthusiasts transport motorcycles or ATVs. It’s also an excellent choice for moving furniture, hauling trade show materials, or serving as a mobile workshop. The enclosed design provides a secure and weatherproof space for any medium-sized hauling task.
The Indispensable Role of E-Track in Modern Cargo Securement
E-Track is more than just a tie-down point; it’s a comprehensive system that fundamentally changes how you secure and organize cargo inside your enclosed trailer.
What is E-Track and How Does It Revolutionize Cargo Hauling?
E-Track consists of high-strength steel rails that can be mounted horizontally or vertically to the walls and floor of a trailer. These rails feature a series of slots, typically spaced every two inches, that accept a wide variety of specialized fittings. This modularity allows you to create an infinite number of tie-down points, providing a level of versatility and security that traditional methods cannot match. You can secure a large machine in the center, strap smaller boxes to the walls, and organize tools with specialized hooks—all within the same system.
Comparing E-Track to Traditional Tie-Down Methods (e.g., D-rings)
Standard D-rings offer fixed, single-point anchors. While useful, they are limiting. If your cargo doesn’t align perfectly with the pre-installed D-rings, you are forced to use awkward strap angles that can reduce securement strength. E-Track solves this by providing anchor points along the entire length of the rail. This means you can always achieve the optimal 45-degree angle for your straps, ensuring maximum tension and holding power. E-track distributes the load force across the rail and its multiple mounting screws, whereas a D-ring concentrates all the force on just two or four bolts.
Specific Benefits of E-Track for a 7x10 Enclosed Cargo Trailer
For a 7x10 enclosed cargo trailer, the benefits are immediate and substantial. E-track allows you to maximize the usable interior space by securing items vertically against the walls, freeing up valuable floor area. It prevents items from shifting and colliding during transit, protecting both the cargo and the trailer’s interior panels. This system adds immense resale value and transforms your trailer from a simple box on wheels into a professional-grade piece of hauling equipment.
Strategic Planning: Designing Your E-Track System Layout
A successful E-Track installation begins with a solid plan. Thoughtful layout design ensures your system meets your specific needs and provides maximum utility and safety.
Assessing Your Specific Hauling Needs and Cargo Types
Before you buy a single piece of E-track, consider what you haul most often. Are you transporting motorcycles that require wheel chocks and multiple anchor points on the floor? Are you a contractor needing to secure tool chests and ladders against the walls? Do you haul a mix of boxes and furniture that requires flexible strapping options? Mapping out your primary cargo will determine where your E-track rails will be most effective.
Choosing the Right E-Track Type and Material
E-Track comes in two primary orientations: horizontal and vertical. Horizontal E-track has slots running parallel to the rail and is the most common choice for walls, offering broad flexibility for straps. Vertical E-track has perpendicular slots and is ideal for creating shelving or using shoring beams to brace cargo. Rails are typically available in galvanized steel for corrosion resistance or with a powder-coated finish. For most trailer applications, galvanized steel offers the best durability.
Optimal Placement and Spacing for Maximum Securement
A common and highly effective layout involves two rows of horizontal E-track on the trailer walls.
- Lower Row: Install the first row approximately 24 inches from the floor. This height is ideal for securing the base of most heavy items and is perfect for attaching E-track wheel chocks.
- Upper Row: Install the second row around 48 to 60 inches from the floor. This provides an excellent anchor point for stabilizing the upper portion of tall items like tool cabinets or refrigerators. For floor installations, consider running two parallel tracks spaced to accommodate the wheelbase of vehicles like motorcycles or ATVs.
Comprehensive E-Track Installation: A Step-by-Step Guide for Your 7x10 Trailer
Proper installation is critical to the strength and safety of your E-Track system. With the right tools and a methodical approach, you can achieve a professional-quality result.
Essential Tools and Materials for a Successful Installation
Gather these items before you begin:
- E-Track rails (measure your trailer to determine the length needed)
- Appropriate fasteners (e.g., 1/4″ self-tapping screws for steel frames, or bolts with nuts and washers)
- Drill with appropriate bits
- Tape measure and chalk line or laser level
- Stud finder (if walls are finished)
- Socket set or impact driver
- Safety glasses and gloves
Preparing Your Trailer’s Interior for Installation
First, clean out your trailer completely. Inspect the walls and floor for any damage. If your trailer has plywood-lined walls, you will be mounting the E-track directly to the metal frame studs behind the wood. Use a stud finder or look for existing screw lines to locate these structural members. This is the most crucial step for ensuring a strong anchor point.
Marking and Pre-Drilling Pilot Holes
Once you’ve located the frame studs, use your tape measure and chalk line to mark a perfectly level line where you will install the E-track rail. Place the rail against your line and use a marker to mark the drill points through the E-track’s pre-drilled holes, ensuring they align with the center of the metal studs. Pre-drilling small pilot holes makes it much easier to drive the larger screws and ensures they go in straight.
Securing E-Track Rails to Your Trailer
Position the E-track rail over your pilot holes. Using your drill or impact driver, secure the rail with the appropriate screws. It is vital to attach the E-track to the trailer’s steel frame, not just the plywood walls. The plywood alone does not have the structural integrity to handle heavy cargo loads. Drive a screw into every available hole that aligns with a frame stud. For floor installations in a trailer with a wood floor over a metal frame, using bolts that go all the way through with washers and nuts on the underside provides the strongest possible hold.
When to Consider Welding E-Track (and Cautions)
For trailers with exposed steel walls or for extreme heavy-duty applications, welding the E-track directly to the frame is an option. However, this should only be performed by a professional welder. Improper welding can weaken the trailer’s frame. For most users, a robust installation with high-quality screws or bolts into the frame offers more than sufficient strength.
Maximizing Your E-Track System: Accessories and Techniques for Secure Hauling
With your E-track installed, you can now utilize a vast ecosystem of accessories to handle any hauling challenge.
Essential E-Track Accessories for Versatile Cargo Securement
The true power of E-track lies in its accessories. Some of the most useful include:
- Ratchet Straps & Cam Straps: The most common accessory for lashing down cargo.
- Rope Tie-Offs: A simple fitting that provides a quick anchor point for ropes.
- E-Track D-Rings: Heavy-duty steel rings that clip into the track, providing a movable anchor point similar to a traditional D-ring but with far more placement options.
- Wood Beam Sockets: These allow you to use standard 2x4 lumber to create custom shelving, decking, or shoring beams.
- Specialty Hooks and Hangers: Perfect for organizing tools, extension cords, and other equipment.
Effective Cargo Securement Strategies for Your 7x10 Trailer
Always secure your heaviest items first, placing them toward the front of the trailer over the axle to maintain proper tongue weight and stability. Use at least two separate straps to secure any significant piece of equipment. For wheeled items like motorcycles, use four tie-down points—two pulling forward and two pulling backward—to prevent any movement. Cross your straps in an “X” pattern when possible to increase lateral stability.
Maintenance, Troubleshooting, and Safety for Your E-Track System
Proper care and attention to safety will ensure your E-track system performs reliably for years. This is especially important given that a 2024 AAA study found a high percentage of trailer users neglect routine safety inspections.
Regular Inspection and Maintenance of E-Track and Accessories
Before each use, visually inspect your E-track rails for any signs of bending, cracking, or corrosion. Check that the mounting screws remain tight. Examine your straps for fraying or cuts and ensure ratchet mechanisms are clean and function smoothly. Clean out any debris from the E-track slots to ensure accessories can be inserted and locked in securely.
Common Installation or Usage Issues and How to Address Them
If an E-track rail feels loose, it is likely because the screws have missed the metal frame or have stripped out. This is a major safety hazard. The solution is to remove the rail, locate the studs properly, and reinstall it with fresh screws or larger-diameter bolts. If an accessory won’t click into place, the slot is likely dirty or obstructed. Clean it out thoroughly.
Prioritizing Safety in All Hauling Operations
Never exceed the working load limit (WLL) of your straps or E-track accessories. The WLL is always printed on the tag of a quality strap. Remember that the total strength of your system is only as strong as its weakest link, which is often the installation itself. Always double-check that every strap is tight and every fitting is securely locked into the E-track before you hit the road. A secure load is a safe load.
Conclusion
Upgrading your 7x10 single axle trailer with an E-Track system is one of the most valuable investments you can make. It dramatically enhances the safety, versatility, and efficiency of your hauling operations, protecting your valuable cargo and providing peace of mind. By following a strategic plan for layout, executing a meticulous installation into the trailer’s frame, and using the right accessories, you transform a standard enclosed trailer into a highly capable and professional piece of equipment. Before your next trip, assess your cargo securement system. A properly installed E-track product is the definitive solution for ensuring everything arrives just as it left.